A bird house is very important because it provides shelter and protection to the birds. However, it also needs proper cleaning and maintenance to make it last longer. In this article, we are listing the step-by-step guide on how to clean a birdhouse effectively to extend its longevity.
What You Will Need:
- Screwdriver and Hammer to be used in fixing the birdhouse
- A toothbrush will be used for cleaning holes and corners
- Toothpicks will be used in cleaning holes and clogged ventilation
- Rubber gloves for protection of the cleaner
- Birdhouse cleaner will be used to eradicate germs and bacteria
- Water for mixing with birdhouse cleaner and rinsing
Step 1: Preparing the Bird House for Cleaning
Before you start cleaning, make sure to make the birdhouse accessible to you. Start by removing or taking down the birdhouse to allow you easy access to it. If you can, try to partially disassemble it so that the hard-to-reach portion of the birdhouse will also be cleaned.
Try to set up your cleaning session at a table where you can use old newspapers or paper towels to quickly dispose of all the dirt and other waste materials. If you can, try to label each part of the birdhouse so that assembling will be accessible after the cleaning. In my experience, birdhouses with hinged roofs, removable fronts, and swinging sides are the easiest to clean.
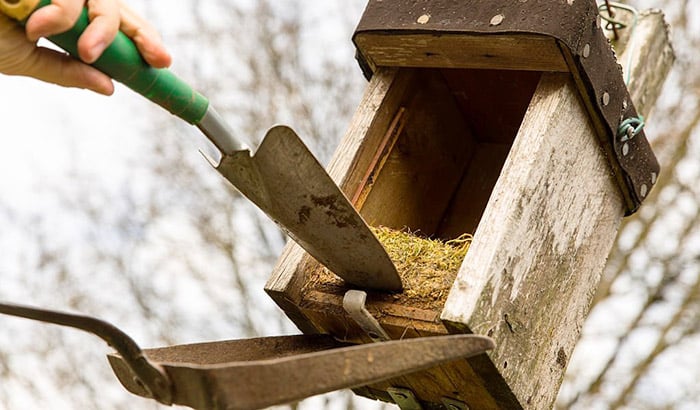
Step 2: Removal of Nesting Material and Other Clutters
Once the birdhouse is disassembled, and the cleaning location is set up, you can now start removing the nesting material inside the birdhouse. You can remove all the dirt like bird feces and other organic matter and put it in a paper towel or old newspaper for easy disposal.
As much as you can, try to remove every dirt you see. This step will make it easier for you to clean and sanitize the birdhouse. Try to throw all the dirt immediately to prevent any spread of parasites and germs. You can have the option for the nesting material to be composted if you want to.
Step 3: Preparing the Cleaning Solution
After removing all the dirt outside and inside the birdhouse, it is now time to sanitize it to enhance the result of the cleaning process. But, you must first make a cleaning solution which is a mixture of one part bird cleaner solution and nine-part water.
Make sure to put the cleaning solution in a large bucket to avoid spilling it. In addition, be very careful in mixing because this bird cleaner is a form of bleach that can possibly stain your clothes. So, be very careful in mixing the bird cleaner and the water.
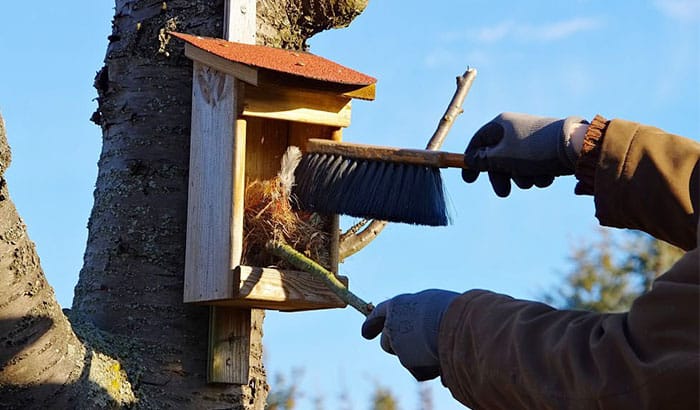
Step 4: Sanitizing the Birdhouse
You can start scrubbing the birdhouse using the cleaning solution you had just created. Use the toothbrush to clean the inside part first, then the rest of the parts of the birdhouse. Try to clean the corners and holes as they are prone to get filled with dirt.
You can also target the drainage, ventilation holes, and entrance holes to remove all the dirt and debris clogging these essential parts of the birdhouse. If there are tiny holes, you can use the toothpick to remove all the clogged dirt on the inside.
Please include cleaning the mounting hardware that helps in hanging the birdhouse. Make sure to remove all the dirt and debris that clings the mounting hardware. However, make sure not to spread the cleaning solutions to nearby plants unintentionally.
Step 5: Rinsing and Drying the Bird House
After cleaning and sanitizing the birdhouse, you can now start rinsing the birdhouse to see the result of the cleaning process. You can rinse the birdhouse thoroughly for a few minutes until there will be no trace of the cleaning solution. Make sure to check the birdhouse by smelling because any remnants of the cleaning solution can possibly hurt the bird.
Once you finish rinsing, you can let the birdhouse dry by putting it exposed in the sunlight. It is best to dry it for several hours to remove the chlorine and all the moisture, and that is still in some parts of the birdhouse. This step will be helpful to remove all the molds and mildew that grow in some parts of the birdhouse.
Step 6: Inspecting the Bird House
Once all the parts are dry, try to inspect the birdhouse one last time before reassembling it. Check the hinges if there are any loose parts. You can also check if there are any protruding screws or nails and other hazards which can hurt the birds. Make sure to remove all these hazards immediately.
You can also check the ventilation holes and drainage holes if it is not clogged. You can have the option of making additional holes if you want to. Doing this action will provide extra comfort to the birds.
Step 7: Reassembling and Reinstallation of the Birdhouse
Once everything is in order, you can now start assembling the birdhouse parts again. Use the hammer and the screwdriver to get the job done. If you have labeled the parts of the birdhouse, then reassembling will be easy for you.
Once reassembled, you can now start installing the birdhouse in its original position. Make sure to install it properly and safely in its original location. Be sure that it is properly secured and strong enough to welcome the birds from using it again.
Conclusion
Learning how to clean a bird house is important if you are a passionate birder. A birdhouse will not only provide shelter but can also be a nesting place to the birds. There are also other uses that a birdhouse provides which makes it very important to clean it regularly.