Are you looking to attract certain songbirds to your yard with a birdhouse? You would be pleased to know that one of the easiest ways to do so is with gourd birdhouses. This post will give you the step-by-step process of how to make gourd birdhouses. With just a few tools and materials, you can attract tiny birds in no time.
Let’s get started with the project!
Contents
Materials Needed
The complete list of materials you will need include:
- Drill
- ¼ inch drill bit
- ⅜ inch bit
- 1 ⅜ inch drill bit
- Craft knife
- Teaspoon
- Paintbrushes (optional)
- Paints (optional)
- Face mask or respirator
- Bleach
- Water
- Steel pad (untouched by soap)
- 400-grit sandpaper
- 200-grit sandpaper
- Varnish
- Wood glue
- Rigid wire
- Outdoor tape
- ⅜ inch thick wooden dowel
- Gourd
Step 1: Cure the Gourd
Curing the gourd takes time, so I suggest you do it in the winter months. You begin by cleaning the gourd with warm soapy water, then wipe it with rubbing alcohol or distilled vinegar after it dries. The soapy water cleans most debris while the alcohol or vinegar chemically cleans it. The vinegar and alcohol also dry its moisture, which is necessary for the curing process.
Move the gourd somewhere dark and dry with good ventilation. It is best to hang it so you won’t have to rotate it every few weeks. If you are curing more than one gourd, make sure they don’t touch each other. If any gourd becomes soft or decays, dispose of it immediately.
A fully cured gourd will have a hard outer shell, and its fleshy meat will be all but gone. The seeds will rattle if you shake the gourd. It should be very light.
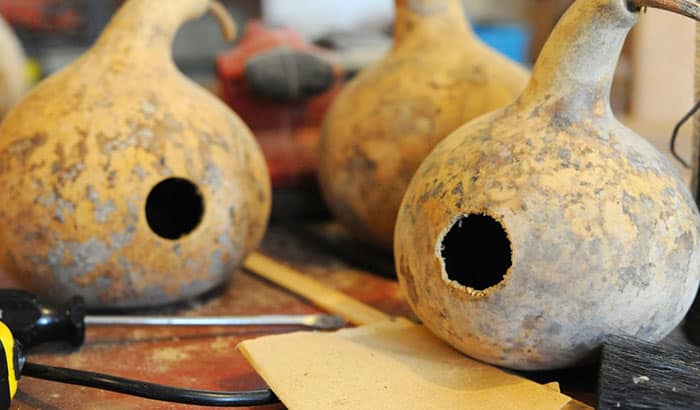
Step 2: Drill the Entrance
Use the 1 ⅜ inch drill bit to create a hole in the bottom and larger bulb of the gourd, right where it begins to curve upward. You can make the entrance bigger, of course, but 1 ⅜ inch usually is enough for most songbirds to get through.
Hold the gourd firmly against a wall or between objects as you drill to prevent mishaps from damaging the gourd beyond repair. Use the craft knife to smoothen and clean the ragged edges of the entrance as best you can. But don’t worry if you don’t make a perfect hole; the birds will usually make adjustments when they move into the birdhouse. The harder the gourd’s shell is, the better the holes you make will look.
Use the sandpapers to smoothen out the hole you make. The 200-grit sandpaper is perfect for removing splinters, while the 400-grit sandpaper is good for giving it a good, smooth surface.
When drilling and sanding the gourd, wear a face mask or respirator because particles like bacterial decay, mold spores, and other microorganisms may be present.
Step 3: Remove the Insides of the Gourd
Use your teaspoon and fingers to clean out as much of the gourd’s insides as you can. If the gourd has cured perfectly, this should not be very hard; you can just shake the insides loose.
Don’t worry if you don’t get all of the insides removed. The first occupants of the birdhouse will remove anything they don’t want from the gourd, that’s for sure.
Pro tip: you can save the seeds for planting. In no time, you may have the means to make more gourd birdhouses!
Step 4: Smoothen the Gourd’s Surface
Using the finer grit sandpaper and a gentle touch, smoothen out the shell of the sandpaper. The higher the grit of the sandpaper is, the finer it is and the smoother a surface it can create.
For the first few passes over the gourd’s surface, use rougher sandpaper (the 200-grit sandpaper should do fine). The rough paper should remove peeling flecks off the shell. Then, rub it with the 400-grit sandpaper to make the surface smooth to the touch.
Step 5: Clean the Gourd
Wash the gourd with a solution of one part bleach to ten parts water. Use a brand-new steel wool pad to scrub off any dust or peeling residue.
The bleach disinfects the gourd from any bacteria or spores. It will also make the gourd’s color lighter, but that won’t really be a problem, especially if you want to decorate the gourd.
Step 6: Drill Holes on Upper Bulb for Wires
Drill a small hole on the upper bulb, near the stem, for the wire. Use the tiniest bit you have, the ¼ inch drill bit, for this part. The hole should go all the way across the gourd so you can put the wire entirely through it.
Sand the ragged edges of the hole to a smooth point.
Step 7: Insert the Wire
Insert the wire through the hole you just made on the upper bulb of the gourd. The length of the wire entirely depends on how you want the birdhouse to hang. I suggest hanging it no more than a foot from branches, so the wire should be about two feet.
Insert the wire and fold it so that the two ends are together. Twist the ends together and secure them with outdoor tape, so they don’t prick the birds.
Step 8: Create the Perch (Optional)
This step is optional, but it adds a nice touch to the birdhouse. Drill a hole beneath the entrance using the ⅜ inch drill bit. Angle the hole a little upwards to compensate for the curve of the vegetable.
Cut the dowel to about 2 to 2 ½ inches long. Rim the tiny hole in the gourd with a generous amount of wood glue, then twist the dowel into it. The dowel should be about a quarter of an inch deep into the gourd.
Place objects that will hold the dowel perpendicular to the entrance and allow the glue to dry at least overnight.
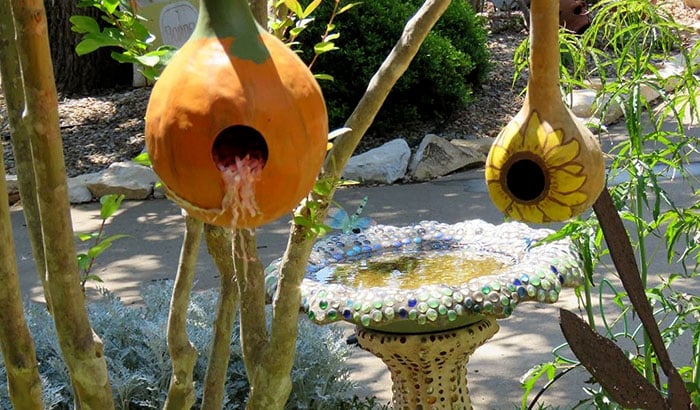
Step 9: Paint the Birdhouse (Optional)
Paint the birdhouse for a nice effect if you want to do so. Spray painting is the best method, I find. I hang the birdhouse and spray paint it with at least three coats. I let each layer of paint dry before applying another coat.
Step 10: Seal the Birdhouse
Seal the gourd with a varnish so it can last longer. Two coats of varnish will suffice to make it last for years. Spray varnish provides more even coverage. If you want to seal the inside of the gourd, pour varnish into the vegetable and shake it around before pouring out the excess varnish.
Step 11: Hang the Birdhouse
The last step is to hang the birdhouse. And that’s it! Now you know how to make gourd birdhouses.
Conclusion
This step-by-step how to make gourd birdhouses guide may have too many steps. But that does not mean that the process is complicated. If you have any crafting and building experience, you can do this without any problem!