One way to attract birds into your backyard or garden is to have birdseed ornaments in your home. This bird food decoration is easy to make and very economical. But, do you know how to make bird seed ornaments? If not, please check our step-by-step guide in making a birdseed ornament easily.
Ingredients You Will Need:
- Birdseed Mix, Gelatin, Cooking Spray
Tools You Will Need:
- String, Cookie Cutters, Small Pan, Measuring Cup, Small Spoon, Baking Sheet
Things to Remember:
The ratio of the gelatin and the birdseed mix is extremely important. Too much birdseed and not enough gelatin will quickly make the ornaments break apart. The ideal ratio for me is two cups of birdseed to two tablespoons of gelatin.
When letting the ornaments dry, you want to dry them overnight. Failure to do so also affects the durability of the ornaments as they easily break apart.
Also, when letting it dry, try to flip it over so that all the sides will get dry. You can dry one side for about four hours, then flip the other side over for its turn in drying.
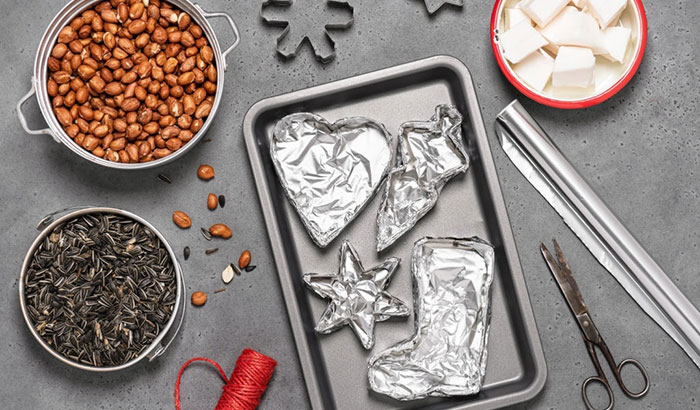
Step 1: Materials Preparation
Gather all the cookie cutters for you to be able to grease them lightly. You can use a cooking spray for this step. After oiling, put the cookie cutters in the place where the baking sheet is set up.
Step 2: Preparing the Gelatin Mixture
The next step is to put water into your pan, which is heated on low fire. After that, put the gelatin as you bring it to simmer by stirring it constantly. Keep going all the time until the gelatin dissolves into the water. During this time, you can see some bubbles on the pan; what you do is keep on stirring until the gelatin is dissolved into the water.
You can see that the gelatin is dissolved once the water is clearer. You need to take out the pan once the gelatin is dissolved. Then, let the gelatin mixture cool for about a minute while you grease the cookie cutters.
Step 3: Mixing the Birdseeds
Once the gelatin mixture cools down, get the birdseeds and mix them with the gelatin mixture in the pan. Mix it thoroughly using a small spoon. Make sure to use just enough birdseeds for the gelatin to hold. Otherwise, the ornaments can easily break apart.
Step 4: Putting the Birdseed Mixture to the Cookie Cutters
The next step is to put the birdseed mixture into the cookie cutters. Make sure to do it slowly to avoid any waste. You can use the spoon to push the birdseeds towards the cookie cutters to make them more compact and fit the design.
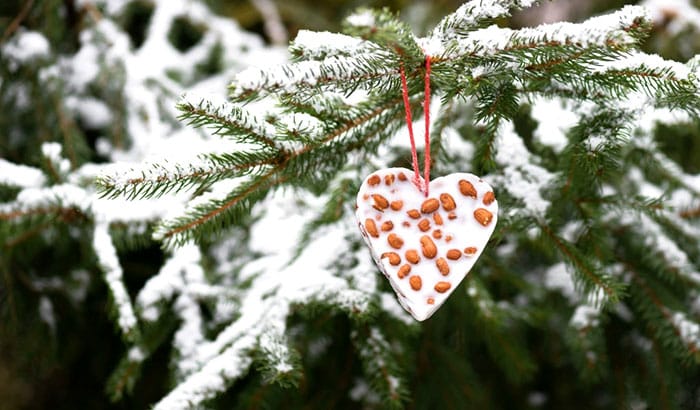
You can also grease the birdseed mixture once it is transferred to the cookie cutters if you want to. Doing this action will enhance the result once the seeds are all dried up. Press the birdseed using a spoon to pack it down. You can take a string and put it right on the birdseed. The string will hang the ornament into the tree or bird feeder stand. You can cover the string with another layer of birdseed to secure and make it challenging.
Step 5: Drying the Ornaments
After putting the birdseed mixture into the cookie cutters, you want to let it dry for a few hours. It is advisable to let it dry overnight for a maximum result. As I have said earlier, you need to let both sides dry by flipping one side over after a few hours of drying for the other side to dry also.
You can have the option to put additional decor to the birdseed ornaments. For example, you can put a ribbon on top before covering it with an excellent plastic cover. Doing this method will make the ornament an excellent gift, especially in the holiday season.
Contents
Making Birdseed Ornaments Without Gelatin
The problem with gelatin as an ingredient in making birdseed ornaments is its tendency to melt quickly during the summer. Meaning, you need to learn how to make bird seed ornaments without gelatin, especially during the hot season.
In this recipe below, our team uses agar-agar powder, plant-based gelatin, which is a perfect replacement for the actual gelatin as an ingredient. Please check our step-by-step process below.
Ingredients You Will Need:
- Agar-agar powder, water, birdseed
Tools You Will Need:
- String, Scissors, Cookie Sheet, Parchment Paper, Spoon
Step 1: Gelatin Preparation
Start by pouring 1/2 cup of water and two tablespoons of agar-agar powder solution into a cooking pan. Put the pan on medium heat. Bring the agar-agar solution to boil and simmer it for about two minutes until thickened. The agar-agar solution is your replacement for gelatin, so make sure to boil it properly to maximize the result. After boiling, let the solution cool down.
Step 2: Mixing the Other Ingredients
The next step is to combine the birdseed mix with the agar-agar solution. Stir the mixture thoroughly until all the birdseeds are well-coated.
Step 3: Transferring to the Cookie Cutter
Put a piece of parchment paper on a cookie sheet while arranging the cookie cutters at the top. You can use the small spoon to transfer the birdseed mixture to the cookie cutters. Transfer the seeds until they are half-full.
Step 4: Putting the String
The next step is to put a string loop in the middle of every cookie cutter. Then, fill the cookie cutter with another layer of birdseeds until full. You can pack the seeds using a small tablespoon to compact the bird seeds inside the cookie cutter.
Step 5: Drying the Ornaments
Allow the ornaments to dry overnight to achieve an excellent result. You need to dry both sides of the ornaments by flipping them to another side after a few hours of drying.
Conclusion
Learning how to make bird seed ornaments is excellent knowledge to have. These ornaments are an excellent way to attract birds by putting them on the trees. These ornaments can also be a perfect gift to anyone who loves birds during the holiday season.