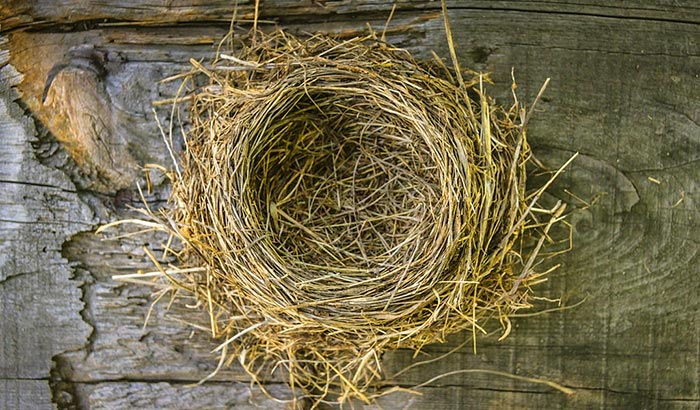
Preserved bird nests can have many uses, especially as a decoration in the home. You can use it as part of a Christmas decor or a quaint display. But in order to do so, you have to learn how to preserve a bird nest. Otherwise, it will just fall apart a day or two after setting it up as decor. Preserving a bird nest is easy enough; you just need a can of clear coat and a few household items, and you are good to go.
Let’s get into how to preserve a bird’s nest!
Contents
Preserving a Bird’s Nest – Step by Step
Before we get into the main meat of this post, we first have to discuss the Migratory Bird Treaty Act of 1918. This law illegalizes moving or messing with bird nests or their contents, including eggs. This law protects nature, so you have to ensure that you are not interfering with nature when you move the nest.
You have to be sure that the nest is not active, that no bird is using it. But sometimes, that is not enough since some birds tend to use old and unoccupied nests. Once you are confident that you will do no harm by moving the nest, you can proceed with preserving it for your purposes.
Step 1: Carefully Remove the Nest from its Position
There is no one way to remove a bird nest because of how differently made they are from each other. But you should try to be as careful as you can since the point of bringing it down in the first place is to preserve it.
I suggest you wear gardening gloves. The gloves will protect you from whatever prickly things that may be in the nest. It will also save you from bugs possibly living in the nest or from pathogens, mites, and bacteria that can cause diseases. I suggest you don’t use rubber gloves because the fibers of the nest can stick to rubber.
Step 2: Sterilize the Nest
Leave the nest in the open sun for a few hours to eradicate its smell and let it dry. Then, place it in a plastic bag and put it in the freezer for a few hours to kill any bugs living in it. For good measure, spray it with a disinfectant to help kill any bacteria in it.
Step 3: Clean the Nest of Unnecessary Debris
While still keeping your gloves on, tap the nest gently to get rid of loose dirt and dead bugs. Keep your tapping gentle so as not to disturb the formation of the essential nest parts.
Then, brush it lightly with a dry paintbrush to further clean it. Try to get as much of the gunk off as you brush it. This is the last stage of the cleaning process, so any dirt you don’t get off becomes immortalized as you preserve the nest.
Step 4: Prepare an Appropriate Workplace
Get an old newspaper and spread it on a flat surface. This newspaper will serve as your workplace for the next steps. Get your nest and delicately place it on the flat surface newspaper.
Step 5: Spray the Nest with Clear Coat
A clear coat spray is a popular choice for hobbyists and collectors who want to protect their collector’s items without compromising their colors. You can easily obtain one from hobby stores or online. It provides a clear coating of protection for anything and is perfect for something as fragile as a nest.
Spray a thin coating of the clear coat on the nest as evenly as you can, then wait for that coating to dry. A clear coat typically takes around ten minutes to dry enough for you to apply a second coat. But I suggest waiting at least thirty minutes because you will not apply a second coat immediately. You want the first coat to be dry to the touch so you can flip the nest and spray its other side.
It’s critical to spray all of its sides with a thin coat of clear coat before adding any second layer, so you’re sure it is evenly preserved. After spraying a light coat on all of the nest’s sides, you can focus on layering a thick second coating. On this second coating, try to get the entire nest instead of just lightly spraying.
Wait for around half an hour for the clear coat to dry. As soon as the second layer of clear coat dries, your nest is ready for decorating.
Conclusion
And that is how to preserve a bird nest. It’s pretty simple. You carefully remove the nest from its perch, then sterilize and clean it. Leaving it out in the sun eliminates the smell; freezing it kills the bugs in it, and spraying it with disinfectant kills bacteria. Use an old paintbrush to remove the solid gunks stuck in it. And lastly, spray it with a clear coat.
A clear coat is the primary preserving agent that will give you the beautiful nest you want.